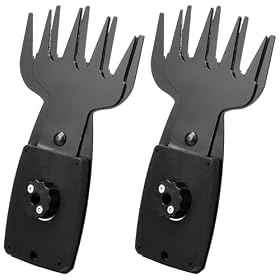
A hedge trimmer with two reciprocating blades may not work correctly with only one replacement blade. Check the manufacturer’s parts diagram, blade pairing, spacing, and fasteners before attempting the repair.
Replacing only one blade in a dual-blade hedge trimmer is possible on some models, but it is not automatically safe or compatible. Many trimmers use a matched upper-and-lower blade assembly, so replacing one rail with an incorrect part can cause poor cutting, vibration, jamming, or damage to the drive mechanism.
Check whether the blades are sold separately
Start with the hedge trimmer’s model number and the manufacturer’s parts diagram or manual. Look for terms such as:
Upper blade
Lower blade
Cutter bar assembly
Blade set
Reciprocating blade assembly
Complete cutter head
If the manufacturer lists only a complete blade set or cutter-bar assembly, replace the assembly rather than trying to find a single rail. If individual upper and lower blades are listed separately, the model may support a one-blade replacement—but the replacement still needs to match the original exactly.
Do not rely only on the blade’s length or tooth spacing. Compatibility can also depend on the mounting holes, guide surfaces, blade thickness, offset, tooth direction, fasteners, and the way the blade engages the drive mechanism.
Why dual blades may need to be replaced as a pair
The two blades move against each other with a carefully controlled clearance. A mismatched blade can create several problems:
The teeth may not pass each other correctly.
The blades may bind when the trigger is pressed.
Cutting performance may be uneven.
Extra vibration may develop.
The motor or gearbox may experience additional load.
A loose or incorrectly positioned blade may become a safety hazard.
Even when one blade is visibly damaged, the other may also have worn teeth, bent sections, or altered clearance. Replacing both blades as a matched set is often the more reliable choice when the manufacturer does not sell a single replacement.
Product prices and availability are accurate as of the date/time indicated and are subject to change. Any price and availability information displayed on Amazon.com at the time of purchase will apply to the purchase of this product.
When replacing one blade may be reasonable
Replacing only one blade can make sense when all of the following apply:
The manufacturer identifies that blade as a separately replaceable part.
The replacement is specified for the exact trimmer model or approved model range.
The remaining blade is straight, undamaged, and within acceptable wear limits.
The manual provides the required installation and adjustment procedure.
The fasteners, spacers, washers, and guides are in good condition.
If the remaining blade is bent, heavily worn, cracked, or missing material from several teeth, installing one new blade beside it may produce an uneven cutting action. In that situation, a complete matched set is usually the better repair.
Product prices and availability are accurate as of the date/time indicated and are subject to change. Any price and availability information displayed on Amazon.com at the time of purchase will apply to the purchase of this product.
Safe inspection and replacement sequence
Disconnect the trimmer before inspecting the cutter bar. Unplug corded models and remove the battery from cordless models. Keep the battery separate from the tool while working, and wear cut-resistant work gloves when handling the blades. Follow the manufacturer’s instructions for any blade lock or service position.
1. Identify the exact trimmer model
Find the model and type information on the housing, rating label, or original documentation. Similar-looking hedge trimmers can use different blade assemblies, and a part that fits the mounting area may still have the wrong tooth pattern or clearance.
2. Clean the cutter bar
Brush away leaves, sap, and packed debris so you can see the blade rails and mounting points. Do not use your fingers to clear material between the teeth. Resin buildup can make a blade appear bent or damaged when it only needs cleaning, but cracked or distorted metal requires replacement.
3. Check for mechanical damage
With the power source removed, inspect both blades for:
Bent rails
Cracked metal
Loose or missing fasteners
Damaged mounting holes
Severely rounded teeth
Uneven gaps between the blades
Excessive side-to-side movement
Do not straighten a cracked blade or continue using a blade with damaged mounting areas.
4. Compare the replacement part
Before installation, compare the new part with the old one. Check its overall shape, mounting holes, tooth orientation, thickness, spacers, and guide surfaces. If the parts do not match exactly as shown in the manual or parts diagram, stop and confirm compatibility with the manufacturer or an authorized service source.
5. Reassemble according to the manual
Use the original hardware only if it is undamaged and the manual permits reuse. Install washers, spacers, guides, and retaining parts in their original locations. Tighten fasteners using the manufacturer’s specified procedure; do not guess at torque or substitute unrelated hardware.
After assembly, move the blades by the approved manual method and confirm that they travel freely without binding. Keep hands away from the cutting teeth throughout the process.
6. Lubricate and perform a cautious check
Apply only the blade lubricant recommended for the trimmer. Excess lubricant can attract debris, while the wrong product may affect seals or collect abrasive material. Once the blade area is clear and the guard is correctly installed, perform a brief no-load check according to the manual. Stop immediately if there is unusual vibration, scraping, rattling, burning odor, or rapid heating.
Common reasons a one-blade repair does not work
The replacement blade is for a similar model
Length alone is not enough to establish compatibility. A blade from a similar trimmer may have different mounting geometry or tooth spacing.
The blades are installed in the wrong order
Upper and lower blades may look alike but are not always interchangeable. Reversing their positions can affect clearance and movement.
A spacer or guide is missing
Small washers, sleeves, and guide pieces help maintain blade alignment. Reusing the trimmer without one can cause looseness, binding, or accelerated wear.
The remaining blade is worn or bent
A new blade cannot correct a damaged opposing blade. Replace both when the pair no longer maintains even clearance.
The drive mechanism is damaged
If correctly installed blades still bind or fail to move evenly, the problem may be in the eccentric, crank, gearbox, or motor coupling. Do not keep running the trimmer to diagnose a mechanical fault.
When to replace the complete blade set or trimmer
Choose a complete manufacturer-approved blade set when the manual does not support individual blade replacement, when both blades show wear, or when the cutter bar has been bent or damaged. A complete replacement unit may be more practical when the correct blade assembly is discontinued, the gearbox is also worn, or the repair approaches the value of the trimmer.
Have the trimmer inspected by a qualified repair professional if the drive mechanism is damaged, fasteners are seized, the blade cannot be aligned, or the tool continues to vibrate after correct reassembly. Do not operate a hedge trimmer with a cracked blade, missing hardware, exposed moving parts, or an unconfirmed replacement part.
FAQ
Can I replace just one blade on a hedge trimmer?
Only if the manufacturer lists that blade as a separately replaceable part and the remaining blade is undamaged. Many dual-blade trimmers require a matched upper-and-lower blade set or complete cutter-bar assembly.
Do both hedge trimmer blades need to match?
Yes. The blades need compatible thickness, tooth geometry, mounting points, and clearance. A blade with the correct length but the wrong design can bind, vibrate, or damage the drive system.
How do I find the correct replacement blade?
Use the exact trimmer model number and consult the manufacturer’s manual, parts diagram, or authorized parts source. Confirm whether the listing is for an upper blade, lower blade, blade pair, or complete cutter assembly.
Why does my hedge trimmer vibrate after changing one blade?
Possible causes include an incorrect blade, reversed blade position, missing spacer or washer, loose fastener, bent opposing blade, or damage in the drive mechanism. Remove the battery or unplug the tool and inspect it before further use.