If your hedge trimmer is not starting, check the power source, safety controls, blade obstruction, and switches before assuming the motor has failed. These steps cover cordless, corded, and gas hedge trimmers.
What do you need help with?
Open an answer, or tell us what we should cover next.
Answered in this guide
Diagnose why a hedge trimmer will not start
Start by confirming the battery, cord, or fuel supply is available and connected correctly. Then check the controls, blade, overheating protection, moisture, and stored debris before assuming the motor has failed.
Disconnect the trimmer from power before inspecting the teeth and blade drive. Remove branches, vines, wire, or packed leaves that can lock the blades and prevent the motor from starting.
Check whether blade condition is causing startup trouble
Inspect for dull, bent, or corroded blades and add suitable lubrication. Excessive blade load can make the motor hum, stop immediately, or move only briefly even when startup succeeds.
Decide whether to repair or replace the hedge trimmer
Repair may make sense when a battery, charger, blade, or cord clearly fails and parts remain available. Replace the whole trimmer when the motor or core electrical system has failed.
Request a topic and help us choose what to build next.
Keep a battery hedge trimmer running through a full hedge
Choose a blade length for a long privet hedge
Requests help us prioritize the next guide. No email required.
One anonymous request per topic.
A hedge trimmer that will not start usually has a simple power, safety-switch, or blade-obstruction problem. Remove the battery or disconnect the power cord before inspecting the blades, then work through the checks below. If the trimmer still does nothing after the basic checks, the switch, wiring, motor, or control board may need service or replacement.
Start with safety
Before troubleshooting:
Release the trigger and switch the trimmer off.
Unplug a corded trimmer or remove the battery from a cordless model.
For a gas trimmer, turn the engine off and let it cool.
Keep your hands away from the cutting teeth, even when the tool appears inactive.
Do not bypass a trigger lock, two-handed safety control, guard, or other interlock.
Follow the manufacturer’s instructions for your specific model. If you smell burning, see melted wiring, find a damaged battery, or notice a cracked housing, stop using the trimmer.
Check the power source first
Cordless hedge trimmer
Confirm that the battery is fully inserted and locked into place. A battery can appear seated while still sitting slightly above the contacts. Remove it, inspect the terminals for dirt or damage, and reinstall it firmly.
Then check the battery charge using the charger or battery indicator. If the charger shows a fault, the battery becomes unusually hot, or the battery is swollen or cracked, do not use it. Replace it with a battery approved for the trimmer or have the tool inspected.
If you have another compatible, known-good battery, you can use it to help identify the problem. Do not force a battery from a different voltage system or product family into the tool.
Corded hedge trimmer
Make sure the plug is fully inserted and that the outlet has power. Test the outlet with another device, if appropriate. Check for a tripped GFCI or circuit breaker and reset it only if there is no sign of damage or a recurring electrical fault.
Inspect the entire power cord, including the plug and the point where it enters the trimmer. Do not use the tool if the cord is cut, crushed, frayed, or has exposed conductors. Use an outdoor-rated extension cord only when the manufacturer permits one, and use the cord size and maximum length specified in the manual.
A corded trimmer may also have a cord-retention hook. Make sure the extension cord is secured as instructed rather than pulling against the plug.
Gas hedge trimmer
Check that the fuel is fresh and that the fuel mixture is the type and ratio specified by the manufacturer. Confirm the fuel valve, if equipped, is open; the stop switch is in the run position; and the choke and primer are being used according to the starting procedure.
Do not keep trying to start an engine that smells strongly of fuel. Move it to a well-ventilated area, allow it to clear, and follow the manual’s flooded-engine procedure. Never start or run a gas trimmer indoors or near open flames.
Product prices and availability are accurate as of the date/time indicated and are subject to change. Any price and availability information displayed on Amazon.com at the time of purchase will apply to the purchase of this product.
Check the safety controls and starting sequence
Many hedge trimmers require more than one control to be held at the same time. Common arrangements include a trigger plus a lock-off button, or controls on both handles. If one control is not fully engaged, the motor may remain silent.
Check that:
The battery is installed or the cord is connected.
The main power switch, if present, is on.
The lock-off button is pressed as directed.
The trigger is held fully.
Any second handle switch is being held correctly.
Do not tape down or otherwise defeat a safety control. If a button is stuck, loose, or does not spring back, the switch assembly may need professional repair.
Product prices and availability are accurate as of the date/time indicated and are subject to change. Any price and availability information displayed on Amazon.com at the time of purchase will apply to the purchase of this product.
Look for a jammed blade or heavy debris
A hedge trimmer may refuse to start if the blades are locked by a branch, vine, wire, or packed leaves. With the tool disconnected from power, inspect the teeth and the area around the blade drive.
Remove loose debris carefully with a brush or suitable tool. Do not pull on a branch while the battery is installed or the cord is connected. Never use your fingers to test whether the blade can move.
After clearing the obstruction, check whether the blades move freely by the method described in the owner’s manual. Do not force them. Bent teeth, a damaged blade, or a seized blade assembly can overload the motor and should be repaired or replaced before use.
Product prices and availability are accurate as of the date/time indicated and are subject to change. Any price and availability information displayed on Amazon.com at the time of purchase will apply to the purchase of this product.
Check the blade and lubrication condition
Dull, bent, or badly corroded blades increase load on the motor but do not always prevent startup. If the motor hums, stops immediately, or the blade moves only briefly, inspect the blade for damage and apply the manufacturer-approved blade lubricant as directed.
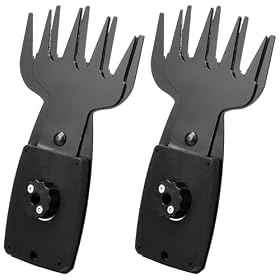
Lubrication is not a substitute for sharpening or blade replacement. Use the correct replacement blade for the trimmer; blade length, tooth spacing, mounting pattern, and compatibility all matter. Never install a blade that merely appears to fit.
Product prices and availability are accurate as of the date/time indicated and are subject to change. Any price and availability information displayed on Amazon.com at the time of purchase will apply to the purchase of this product.
Check for overheating or overload protection
Some cordless and electric trimmers stop temporarily after overheating or becoming overloaded. If the tool stopped during thick or dense growth, disconnect it, clear the blade, and let the motor and battery cool completely. Avoid repeated trigger pulls while it is hot.
Reduce the load by cutting branches within the diameter recommended for the trimmer. Do not force the blade through woody stems that are too large for the tool. If the trimmer repeatedly shuts down under normal conditions, it may have a failing battery, motor, controller, or thermal protection system.
Check for water or stored debris
Moisture, grass, and hedge clippings can collect around switches, vents, battery contacts, and the blade drive. With the tool disconnected, brush away dry debris and allow damp components to dry fully. Do not spray water into the housing or use a pressure washer.
If water entered the motor, battery compartment, charger, or control electronics, do not power the trimmer to see whether it works. Have it inspected, especially if it was exposed to rain or dropped into water.
When the motor or electrical system is the likely problem
If the trimmer has a charged, compatible battery or a confirmed power supply; the safety controls operate normally; and the blade is clear, the fault may be electrical or mechanical. Possible causes include a failed trigger switch, damaged wiring, worn motor brushes on some designs, a failed controller, or a seized motor.
Signs that service is needed include:
No sound or response from a confirmed power source
A burning smell or visible scorching
Intermittent operation when the handle or cord moves
Loud humming without blade movement
Sparks, smoke, or a breaker that trips repeatedly
A battery or charger fault that returns after basic checks
Do not open a battery pack or bypass electrical protection. A qualified repair technician should diagnose internal faults, particularly on cordless models with electronic controls.
Repair or replace the hedge trimmer?
A replacement battery, charger, blade, or cord may be reasonable when that component clearly fails the basic checks and is still available for the model. Replace the entire trimmer when the motor or control system has failed, repair costs approach the cost of a suitable new tool, or replacement parts are no longer supported.
Choose a replacement based on the hedge rather than motor claims alone. Consider the branch thickness the tool is designed to cut, blade length, total weight, power source, battery compatibility, and whether you need a cord-free or pole-mounted setup. Keep the manual and model information available when ordering parts.
FAQ
Why does my cordless hedge trimmer have power but not start?
Check that the battery is fully charged and locked into the tool, then verify the lock-off button, trigger, and any second handle switch. Clear the blade of branches and debris and let the tool cool if it recently overheated. If a known-good compatible battery does not help, the switch, controller, motor, or wiring may need service.
Why will my corded hedge trimmer not turn on?
Test the outlet, reset a tripped GFCI or breaker if safe, and inspect the plug, extension cord, and cord-retention connection. Do not use a damaged cord. If the trimmer still does not respond with a confirmed power supply, the switch or internal electrical system may be faulty.
Can a jammed blade stop a hedge trimmer from starting?
Yes. A branch, vine, wire, or packed debris can lock the blade or trigger overload protection. Disconnect the battery or cord before clearing it, and do not force or handle the blade with your fingers.
Why does my gas hedge trimmer not start after refueling?
Confirm that the fuel is fresh and mixed or specified correctly, then check the stop switch, fuel valve, choke, and primer sequence in the manual. If the engine smells strongly of fuel, it may be flooded; use the manufacturer’s clearing procedure and work outdoors.
Is it worth repairing a hedge trimmer that will not start?
A battery, charger, blade, or cord can be worth replacing when it is clearly the failed part and compatible replacements are available. A failed motor, controller, or switch may make replacement more practical, especially if the tool is heavily worn or repair parts are unavailable.